Translate

Showing posts with label Love Entwined. Show all posts

Thursday, March 31, 2016

March Mumbles

 
"Diamond Down the Drain", 32"x32"

This is the red/green scrap quilt I was working on last month. The name refers to the pieced diamond just off left center and the spiral quilting. I used a lot of my red and green scraps but there's always more where they came from.

I used Crazy Mom Quilts instructions to make a Scrap Vortex quilt and her tutorial for spiral quilting. Here's a link to her blog with the instructions. That spiral quilting just about did me in but I love the effect!  Linda, at Flourishing Palms blog, has some tips for spiral quilting success too.
 
I've been wanting to try some simple walking foot machine quilting for some time and now that my arms are no longer aching, I'm glad I did the spiral quilting! 
 
During March I also bound my Mediterranean Hexagon quilt which was the result of a class I took with Kaffe Fassett at the International Quilt Festival in Houston. It will hang in my quilt guild's upcoming quilt show, Common Threads Regional Quilt Show, June 16-18, Wichita, KS.

 I asked my machine quilter, Jan Hutchison, to follow the lines of the flowers. I've lightened the photo so you might be able to see the quilting. Most of the fabric is Kaffe Collective but I especially like that I was able to use some thrift store Jinny Beyer fabric in the triangles.

 I decided I'd ignored Love Entwined (LE) quilt long enough! This is what Part 8 looked like on March 14. I finished the flowers in the pot on the right border and added some 1/8" circles in the pink flowers. They were definitely a challenge to make. Each of those yellow flower petals are less than 1/2" square! At this point I'm wishing I'd made those broderie perse.

 The green leaf wreath - kind of fun to applique.


 The pink and gold flowers and leaves (what are those things?) - its going to be a long time before I feel my inside curve applique is good. More green fried eggs! Do I sound excited?

My progress as of today - March 31. 
 
I feel like I've been stitching in slow motion but I just realized I've only been working on LE for the past two weeks. I was hoping to finish both the upper and lower part 8 borders by today but maybe my slow and steady applique progress isn't too bad after all!
 
Still no final color/fabric decision for the border between the zig zags. Today I'm leaning toward gold but tomorrow? I think when I'm finished with the part 8 & 9 borders I'll try out fabrics at the quilt shop until one speaks to me. 

My goal for April - finish part 8 and start part 9. Its interesting to me that the upper and lower borders are a different design than the two side borders.

Until next time, Mayleen

Monday, February 1, 2016

January Jumble

Prairie Quilt Guild's tradition is that the immediate Past President may ask the membership to make a quilt block of her choosing. She then puts together the quilt as a remembrance of guild members. I took a little different path and asked for orphan blocks. One guild member gave me all of these vintage quilt blocks!

It took a bit of pondering but I decided on a layout after carefully measuring and trimming the blocks. Yes, quite a few points got chopped off and nothing is even. Some of the blocks weren't the right size so I added an extra strip of fabric. Do you see my little mistake? I didn't calculate the correct amount for the inner spacer border and had to add a narrow purple and gray strip under the red border. I like it just as it is and someday will have it quilted with a Baptist Fan design.

I'm guessing most of the fabrics are from the '60's, the era I grew up. They remind me of my Grandma Goossen's aprons. She was a great influence in my life and I miss her very much. She liked to crochet and tat but I didn't know until after her death that she had also quilted for a short time. The quilt she made was used up and gone before I came along.

On to another subject, Quilty 365. I told myself I wasn't going to get involved with this but I did anyway. The idea, which I think is a great idea, is to make a block a day in 2016. Here's the link if you want to play along:

January 1 - I made a block
January 2 - I made a block
January 3 - I forgot to make a block
One day, I remember I was supposed to make a block a day so I make 5 more to catch up.
I forgot again and again and again.
I think I'm going to make and applique the circles for the rest of the background blocks, stitch the blocks together, add borders and call it something like "Twenty-seven days in Winter" (if I make it to 27). I'm anticipating my kids cleaning out my sewing room someday and wondering why 27 days?!?

What's this mess? These are the bits and pieces for Bonnie Hunter's latest mystery quilt, Allietare. I wasn't going to do this one either but I decided it would help me improve my piecing skills. Allietare is Italian for gladden, rejoice, become cheerful! 

For some reason, this project didn't have that effect on me and one day I decided my attitude would greatly improve if I put all the bits and pieces away. All the units are finished, some need trimming before they're sewn into blocks. I think I was just so disappointed with my piecing skills that I needed a break from this project. Maybe a quilt top will happen in the future.

I started working on Love Entwined again! Most of the little pieces in the flower arrangement are glue basted and waiting to be stitched. Do you see the red tulip on the left side of the pot of flowers? I got it all stitched down and realized the petals don't cover the stem, they just barely meet it. At first I thought I'd just applique a small circle at the base of the flower to cover my mistake but as time went on, I realized I'd always remember that it wasn't appliqued correctly. I made up my mind to take the flower completely apart and reposition it. 

However today at my Applique Group meeting, one of the ladies suggested that if I just move the lower red petals down I wouldn't have to take all those tiny petals off. Sometimes solutions are so obvious I don't recognize them!

Now this is totally different for me. I'm taking part in a color challenge and the first assignment is neutrals with only one (maybe two) accent colors. No patterns, has to be original work. Ordinarily, I would never choose gray and peach but it is a challenge so a challenge it will be. Its supposed to be finished in three weeks but I'm not even sure what finished will look like! Lots more work to do on it.

There's some play going on too! While in Houston at the International Quilt Festival last fall, I took two classes with Kaffe Fassett. This is one of the classes, Bright Squares from his book, Heritage Quilts. I haven't always followed the light, dark, light layout but I'm still playing and enjoying it.The colors are so much better in real life! 

I chose polka dots because, even though I seem to have quite a few polka dot fabrics, I rarely use them. Suddenly there seemed to be polka dot fabric in each quilt shop I went to and I ended up buying "a few more" fat quarters of fabric. Now I have more polka dot fabric than when I started!

One more row of three blocks to go and these are the squares I have left. At first I was going to use what I had left and discover new exciting color combinations. That's not working and I'm going to have to cut more. I was surprised which colors do not play well with others. I can't keep that bright yellow Aboriginal Dot from trying to steal the show.

Leftover squares are going to be made into a doll quilt for our granddaughter, Elizabeth. I hope she likes bright yellow and peach with pink polka dots!

 I'm learning how easy it is to make a Dresden Plate and what fabrics not to select.

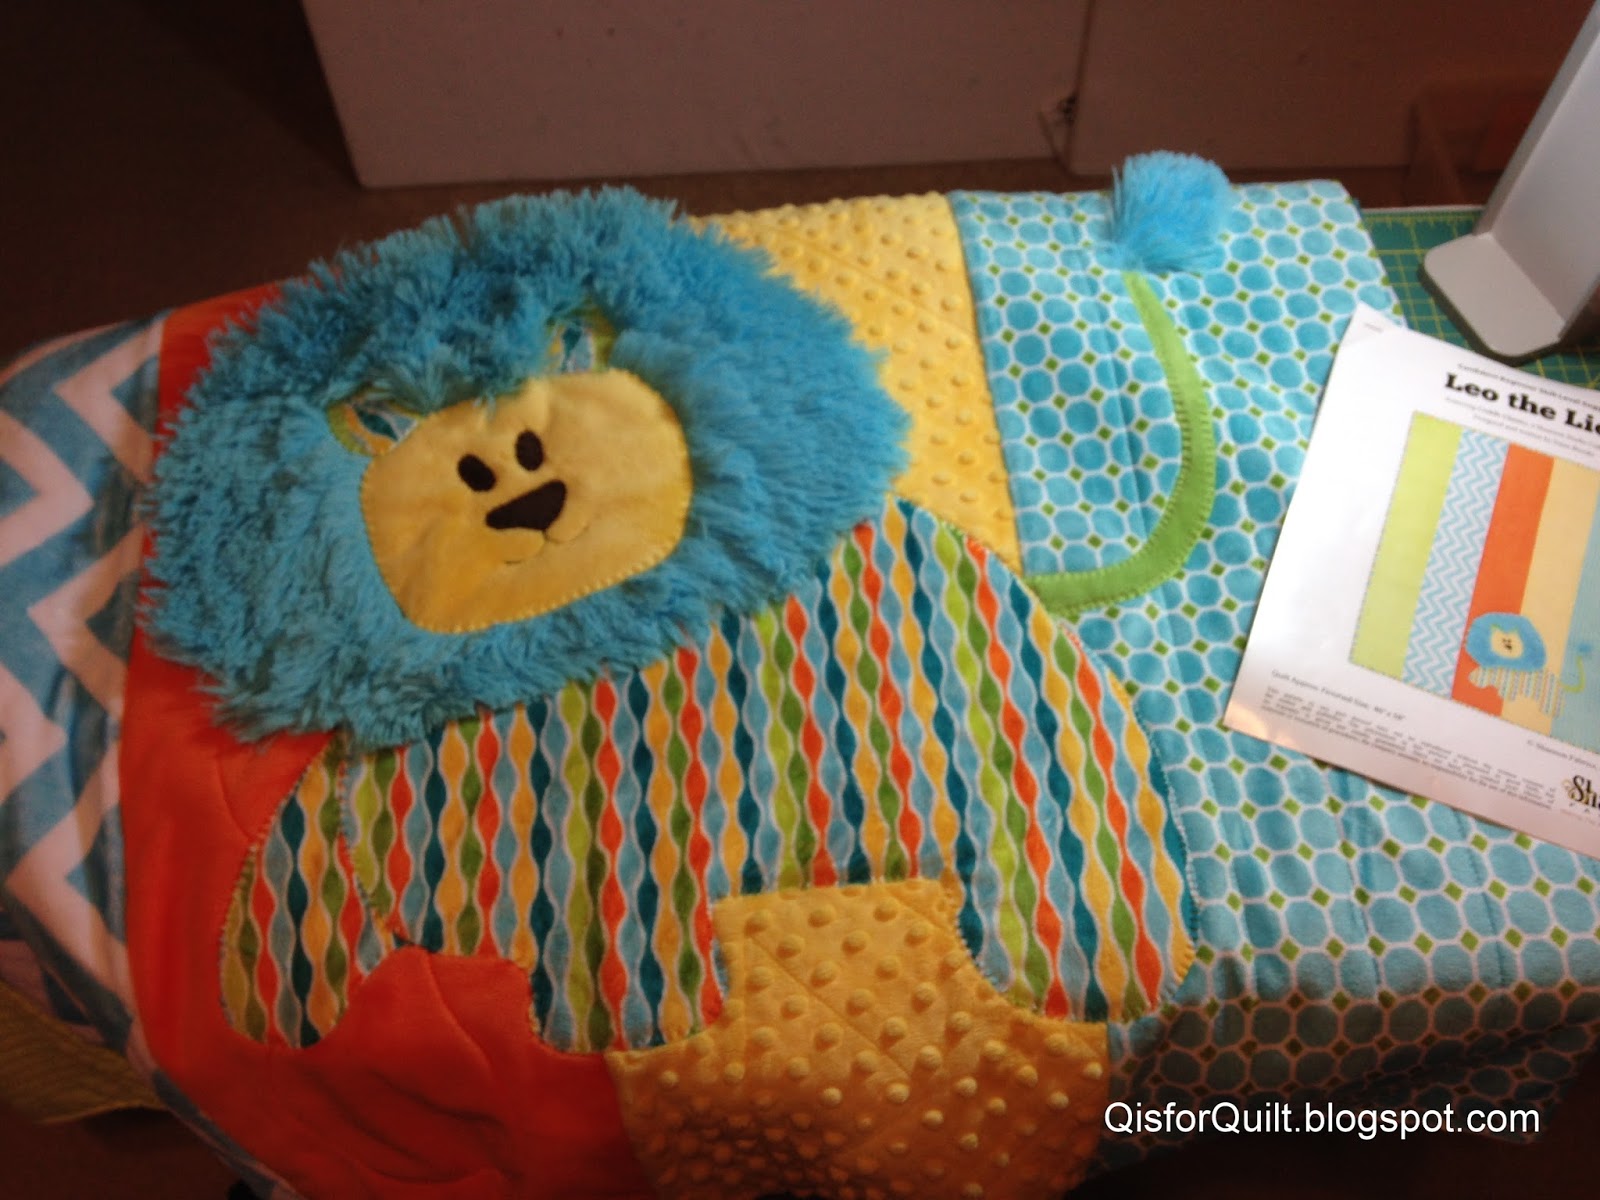
Leo the Lion was delivered to our grandson, Ethan, during January. Unfortunately, I forgot to take a full photo of it. Just recently, the weather was 70 degrees where he lives so I don't know if he's able to enjoy this very warm quilt. However, winter's not over yet.

Mediterranean Hexagons was the other class I took from Kaffe Fassett and Liza Prior Lucy at Houston. Last week, it went to the machine quilter. Since she's going to be closing her customer machine quilting business, this will be the last quilt she quilts for me. I'm looking forward to seeing how it turns out! 

This quilt will hang in the Common Thread's quilt show this June. If you're anywhere near Wichita, Kansas June 16 - 18, please come to our show!

This is the backing of my Mediterranean Hexagon quilt. A little out of my comfort zone but I like it. How far would you drive for a certain kind of fabric? Unfortunately, my local quilt shop didn't carry a Kaffe fabric which would work for the Mediterranean Hexagon backing. I purchased "Brandon's Brocade" from Material Girl in Grand Island, Nebraska which was at least a 5 hour drive one way for us, regardless of what Google predicted. Its not what I thought I'd buy but its what the quilt needs.

That was January for me. It started out dreary but ended well. I had a finish, a few quilts put on hold but am looking forward to a finish or two in February!

Until next time, Mayleen

Wednesday, October 21, 2015

Toot, toot

Slow applique, very slow applique. This past week, I finished appliqueing the zigzags on both top and bottom borders. Then I started on the little pot of flowers on the upper border. It was fun to see how narrow I could make the stems.

Those little yellow flowers just about did me in - 55 little petals. The lower yellow flowers have been appliqued down (except for half of the centers) but all the other flowers and leaves are only glue basted. I see now why most other LE makers decided to do Broderie Perse!

Here's a shot of progress so far.

 Friends have told me I need to toot my own horn a little more so here it is: Toot, toot!

My quilt, "Selvage Star of Bethlehem", will be hanging in the "In the American Tradition" exhibit at Houston next week! It will also travel to other Quilt Festival shows this year.

I plan to be at IQF in Houston next week so if you're there and you see a gray haired, 55+ year old quilter wearing jeans and a T-shirt, be sure to say hello! Ha.

Until next time, Mayleen

Wednesday, October 14, 2015

LE - Stitching Part 8

This past week, I finished appliqueing the "pixies" or triangles with feet (whatever you want to call them) and have made and glue basted the zigzag appliques on the upper and lower borders. A few hours of stitching is ahead of me before I start the applique motifs which appear in the middle of the borders.

The thought has occurred to me there are more applique pieces in the borders than in the vases!

I'm also trying out border fabrics. I'm not convinced it will be gold but that's the best choice so far. When I finish the part 8 & 9 borders, I believe a trip to the fabric stores will be necessary!

Stitching,
Mayleen

Wednesday, October 7, 2015

The Bleed is Gone!

After a long soak, the fabric bleed is gone! This is what the Love Entwined center looks like now.

This is before the soak. If you look around the red petals of the six petal flowers, you can see some pink tinges. In real life, it was very noticeable. I used the soaking method using Dawn dish detergent recommended by Vicki Welsh. Go here for more information:
 http://vickiwelsh.typepad.com/field_trips_in_fiber/2014/01/bleeding-quilts-please-read-this.html

The LE center is only about 32 inches square so I soaked it in a storage tub in a mixture of warm water and blue Dawn. I weighed the center down with clean food storage lids and plates. I did not add a Color Catcher because all that would have done is shown me how much dye was in the water. 

While the LE center was soaking and drying, I was preparing to start work on part #8, the first upper and lower appliqued borders. I'm waiting to make a decision about the color of the fabric border between the center and the applique border. As you can see in the photo below, I plan to miter the part 8 & 9 borders and not make part 10 as a cornerstone.

What happened next is one reason I don't like to work ahead. I prepped all 144 triangles for both parts 8 & 9 only to discover I'd made them too large. At least it was too large and not too small! So now I'm remaking the triangles one border at a time. The first border's triangles are stitched down and I've started working on the lower border's triangles. 

It doesn't look like much progress this week but I know I've been working on it every day! After 2+ weeks, my cold is finally getting better and I'm feeling like I have some energy.

Some time during those weeks, a special package arrived from Australia. I've always admired Jen Kingwell's pattern "The Circle Game" and I won it in a giveaway on Carole's blog! Thank you, Carole! 

Until next week, Mayleen

Wednesday, September 30, 2015

Love Entwined Center

My goal was to complete the center of Love Entwined (LE) by September 30th and I've done it!

You might notice a few changes from my last post. I decided to use the red gingham "fried eggs" and replaced the multi-color triangles around the Mariner's Compass with scrappy blue triangles.

There are a few things I would still like to do - that crooked embroidered fern in the lower right hand vase is bothering me so I'll probably redo it and I'd also like to embroider around the edges of the calla lilies in the upper left hand vase. 

However, those things will all wait until after I soak the top to remove the fabric bleeds. I plan to do that tomorrow and will blog how successful it was next week. For now I'm just enjoying looking at the LE center!

Meanwhile, I've cut out 144 triangles to use in the next border and have started prepping them. Here they are, four in each color. That should be enough plus a few more. I use the starch method to applique so I cut, prep, then glue baste and applique onto the background.

The Love Entwined borders are all intense applique. Lots of pieces which is something that seems to attract me!

Until next time, Mayleen

Wednesday, September 23, 2015

Time to try again

(Just a little whining before I try to fix what I did yesterday.)
I probably shouldn't have worked on my Love Entwined (LE) yesterday but maybe it was a good "learning experience"!
 
- I now have two small fabric bleeds from the red petals. Don't ask how that happened. I should have known better. I'll finish this part of the quilt top and then soak it in hopes of removing the bleeds. If I can't get them out, I'm going to be very disappointed.
- Then I made eight of those light blue fried egg shapes (upper and lower centers) and I'm not convinced that I'm liking them. I'm just glad they're only pinned on and not stitched down yet. I plan to remake them in a red gingham to see which is better.
- I started replacing the heart wreath on the right but the center where the points meet could be done a lot better. Today I'll also pick out my stitching and try to remove the glue basting without damaging the hearts.

When I was working on my Phebe quilt, someone remarked that to make a quilt like that one needed a lot of time. Along with time, I'd add persistence. 

"Don't let the fear of the time it will take to accomplish something stand in your way of doing it. The time will pass anyway; we might just as well put that passing time to the best possible use."
- Earl Nightingale
 
Time to try again, Mayleen

Saturday, September 19, 2015

Three is Enough!

This week I've been working on Love Entwined, Part 7 - Vase #4. One of the things left to do on this vase is to applique six tiny circles above the small flower with the yellow exterior and pink interior on the upper left hand side of the bouquet.
In the past, I've sometimes used a sequin when I can't find the right size circle template but that didn't work this time. I needed a 1/8 inch circle but the smallest template I had was 3/8 of an inch.
Today I found a 1/8 inch circle hole punch so I made my own template by punching non-melt mylar template material. This isn't meant as a tutorial but I thought you might like to see how I made the 1/8 inch fabric circles. I apologize for the quality of the photos in advance.

Here I'm using a stiletto to hold down that tiny 1/8 inch circle template onto the backside of the fabric. I'll use a mechanical pencil to draw around the template.

Next I stitch a small gathering stitch around the drawn circle as close as I can get to it. Looks like I may have missed a stitch on the circle. Try not to do that. You want as small a stitch as possible so that the gathers will be even when you pull up the stitching.

Trim away excess fabric close to the stitching. Don't go too close or the fabric will fray away but don't leave too much fabric either. You don't want a lot of bulk.


A tweezer is handy to grasp the 1/8 inch template circle.

Hold the template down with the stiletto and dab on liquid starch. I use Best Press and a Q-Tip. Some quilters use a small paint brush.

Carefully pull up the gathering stitch. Now you'll see all the bulk of the gathers. You may have to manipulate the fabric to lay evenly.

Using a craft iron, press the gathers from the wrong side smoothing out edges. When I'm happy with the shape, I press the front and back again. Allow the fabric to dry thoroughly before carefully prying open part of the gathers and removing the template. Reshape and carefully pull up the stitches gathering the circle again. Once happy with the shape, I press again, snip off the thread and its done!
 
 Just a suggestion - you probably don't want to try this on a bad day. LOL

After making three of the 1/8 inch circles, I decided three was enough! They're glued on in the photo above ready to be appliqued. Not perfect circles but good enough for me. Tonight I'll embroider the berry stems and then Vase #4 will be finished!

What's up next? I wasn't happy with the heart wreaths so I removed them and have made new hearts. I am hoping for sharper points that meet this time. I'm leaving the fried eggs till last.

Until next time, Mayleen  

Friday, September 11, 2015

Resurfacing!

Its been 2 months since I've written a blog post so I'll try to fill you in on what I've been doing. Most of my time has been spent finishing up my term as president of the Prairie Quilt Guild in Wichita, Kansas. However, I did finish two more UFO's and here's the first:

"Just Ducky", my August UFO finish #8
I started this baby quilt years ago while my kids were still in school many years ago. I didn't know anyone who was having a baby but I thought it was cute. Besides learning to do fusible applique, I learned that its a good idea to line fabrics so the background doesn't show through. The backing is a fuzzy duck print. Quilted by Tricia Lehman. I may give this to my daughter whose baby is due any day!

A few Prairie Quilt Guild traditions - 
The outgoing president makes a gift for each board member. These were my gifts - pincushions pieced from red, pink, purple and gray fabrics. Those squares are about 1/2 inch square. Now that I've worked that small, I'm wondering if I can piece even smaller!?!

Another tradition - The Board makes a quilt for the outgoing president. This is a signature quilt made with many Kaffe Fassett fabrics. The signatures are from the board members, some of whom are pictured, and guild meeting speakers from the past year.

"Cheddar Cheese and Crackers", UFO finish #9
This was a 2009 quilt-a-long on the Humble Quilts blog and is finally finished! The hand quilting was what kept me from finishing this UFO on time. I'm going to have to check if this small quilt is really as wonky as it looks in the photo!

Recently I've begun working on Love Entwined (LE) again. As you can see, I'm busy stitching on Vase #4. When its finished, there's some redo work and I still need to add those fried eggs! I've set a goal to have the entire center finished by the end of the September. At that point, I'll decide if I'll add a narrow border to the center and call it done or if I'll attempt the borders.

Did you see the Houston Quilt Festival button at the top of the right hand side bar? Selvage Star of Bethlehem will be hanging in the "In the American Tradition" exhibit! I'm planning to be there too.

Until next time,
Mayleen

Friday, April 10, 2015

Friday already?

I feel like spring is rushing by, so much to do. I have accomplished some stitching this week which surprises me because my schedule is full!

My April UFO finish is ...
Pumpkin Peel from the book Small Pieces, Spectacular Quilts 
written by Mary Elizabeth Kinch and Biz Storms. I used blue bias binding which I don't think you can see very well in the photo.

 Here are some photos of the machine quilting done by Jan Hutchison.


This is a large wall quilt, nearly 80" square. For now, I plan to store it on a spare bed because I'm already seeing fold lines just from having it folded since getting it back from the machine quilter.

After seeing another blogger's progress, (Quilts...etc.), on her Love Entwined quilt, I was inspired to get mine out and start appliqueing the stems for Part 6.


I had previously taken off the heart wreath on the left in the photo to try to make the points sharper. Not sure I'm making a major improvement but it looks better to me.

 Serengeti Oaks is at the machine quilter and I should be able to share it with you next month.

I also continue to big stitch quilt on my Jubilee+5 quilt. I can only manage to stitch a few blocks before my fingers are too sore to continue so its going slower than I'd like. You'll notice the bird is still there. Embroidery starting soon!

Until next time, Mayleen